When You go abroad, using cellular line is, usually, a problem. Due to expensive international call rates! Fortunately, in recent years eSim become more popular and much cheaper, compared to regular phone plans. With eSim, you can buy much cheaper plans and use it (usually) more than one country at affordable rates. Great! But there is a problem: When you are in abroad, naturally, you want to use your primary call number by using eSim data line. Here, I will explain, how to use your eSim line to make phone calls with your primary phone number.
Prerequisites
Step-0.1 – I’ll explain the steps according to iPhone, but Android steps must be similar
Step-0.2 – I’m assuming that you have bought an eSim line and installed it properly. If it is not, make it first!
Step-0.3 – I’ll name my Primary phone line as “Primary” and eSim line as “Secondary“
How to Use Primary Phone Number With eSim
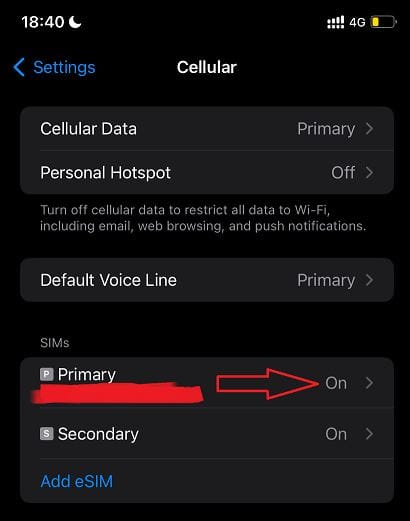
Step-1: Open Settings –> Cellular
Step-2: Select Primary at SIMs area.
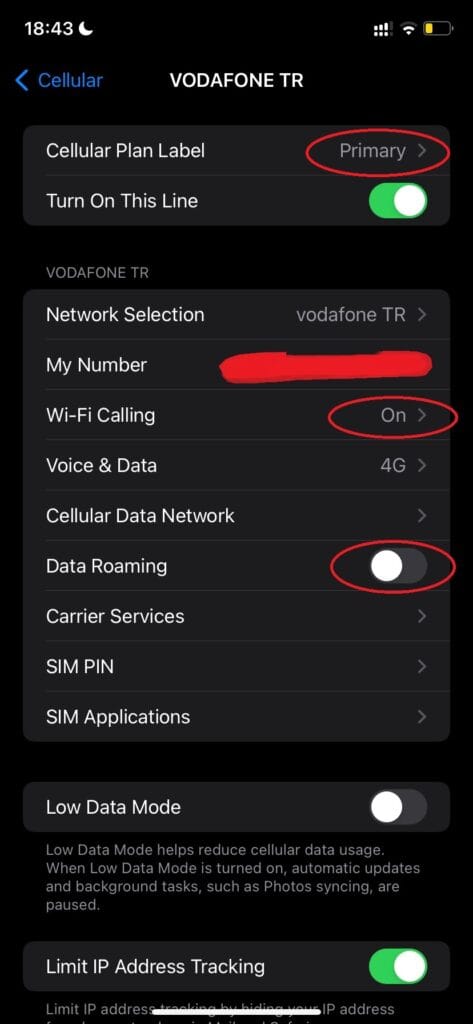
Step-3: Select Network Selection and disable Automatic (if it is not). Now select your Cellular Line Operator manually. This step is extremely important and must be done before going abroad.

Step-4: Back to previous menu then, enable Wi-Fi Calling and disable Data Roaming. Wi-Fi calling is a good property; you can use it in normal life. By that option, you can call/text even if you are not reachable by Telco operator, but Wi-Fi is available, for example when you are in basements. Disabling Data Roaming (at your Primary line) ensures that you will not be charged at abroad.
Step-5: Back to previous menu and select Secondary (new eSim line). At that menu enable Data Roaming (if it is not).

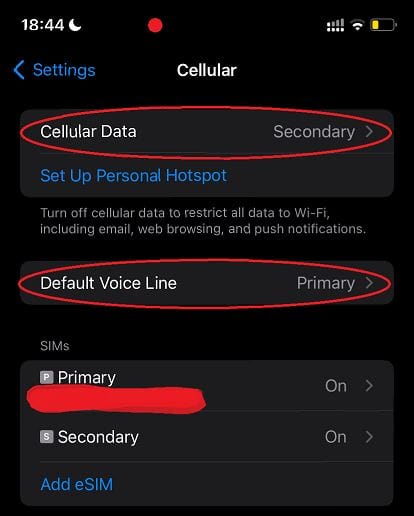
Step-6: Back to previous menu and select Cellular Data to Secondary (eSim line) and select Default Voice Line to Primary (your native phone operator)
Step-7: TEST: Before going abroad, you can test this configuration. Only thing you should is changing your operator to other than yours at Step: 3.
After testing, don’t forget to change it back to your original operator.
Pro Tip: I have changed my operator at Step:3 and tested it without problem. BUT, just before going abroad, made another test and this time it did not worked! Changed many things, restarted my iPhone etc. but no way! At the end, I have updated my iPhone’s IOS version to latest one (17.2 to 17.6.1) and worked without any problem! If you meet a problem, you can try it also.
We are using BNESIM eSim operator in Europe trips for more than one year and We are fairly happy. It’s coverage and speed are very good. Mostly provide high speed 4G/5G access. Their prices are also fair. Not cheap or expensive. Good combination of price and quality.
The most We liked with BNESIM is, it has a “timeless” option. Most of the eSim operators provide maximum 30 days packages. After 30 days, all your remained Gigabytes gone! In BNESIM, You pay a few bucks more and get timeless eSim. Your Gigabytes will not be gone after 30 days. You can use your Gigabytes even after 10 years! This is great!
If you want to use BNESIM, you can use that promotion codes for your first BNESIM purchase:
726GF13X code for 3€ Discount
IZREVIEW code for %20 Discount
Check plans @ BNESIM https://bnesim.com
Written by Metin Karal
Metin Karal is a Computer Engineer with over 25 years of experience working with internet technologies, trends, and digital tools since 1995. He brings this deep background into his product reviews, combining technical expertise with careful research to deliver honest, practical insights for readers. Passionate about technology, Metin also enjoys programming in C# and is currently developing PairMem, a challenging memory game available for free on the official Microsoft Store.