HP 250 G3 notebook is around 10+ years old, and it was extremely slow for even daily use. It has 4GB RAM and 500 GB mechanical harddisk. On the other hand, I know from my old experiences that, mechanical hard disks are the weakest link for a slow PC! Even changing only, the HDD with an SSD can speed overall system performance very much.
Written by Metin KARAL – Review Editor
We research, test, and when applicable, rate the products. With over 25 years of experience in internet technologies and digital trends, Metin KARAL knows the importance of trusted reviews. He provides hands‑on insights into budget tech products, combining technical expertise with practical evaluation.
Nothing on this site is sponsored. We only make money if you purchase a product through our links, at no extra cost to you.
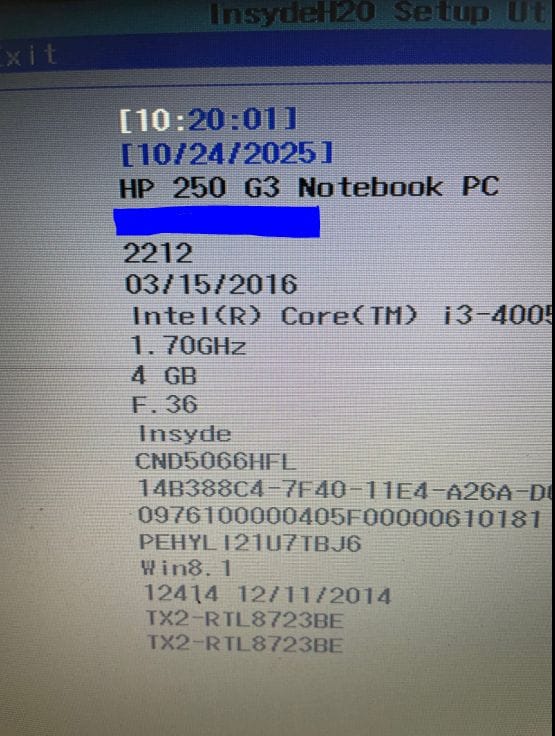
HP 250 G3 Notebook Specs
- 500 GB Mechanical HDD
- 4 GB RAM
- Intel Core i3 4005 CPU
- 1.7 Ghz CPU Clock speed
- Windows 10 OS (Upgraded from Windows 8.1 earlier)
I know, these specs are fairly ancient, compared to modern notebooks, but I hope my HP 250 G3 notebook can be used for most of the daily jobs after SSD upgrade. Let’s see what will be happen after SSD upgrade? 🙂
Disclaimer and Caution
HP 250 G3 disassembly require basic knowledge in using screwdriver and basic disassembly experience. But not too much! I’ll drop a YouTube video below for this notebook disassembly. If you believe in that you can do it, go on. If not, require assistance or go to a service for upgrade.
Notice that disassembly of HP 250 G3 is not difficult but, if you don’t have experience, at some point, you might make a mistake and that may cause complete notebook failure. Do it in your own risk!
Before Starting…
Replacing your HDD will result in the loss of all stored data and the operating system! For this, you must backup your data, if any. After replacing, you will need to re-install operating system (Windows 10? Windows 8?) and restore your backup data.
If that seems a bit complicated, the easiest solution is to create an image of the old HDD. By that way, you can take backup of data and OS to an external storage disk (Assuming you have one).
At this point, I advise Macrium Reflect software. It is a perfect cloning/imaging tool, but they removed free copy from their web sites. Fortunately, free (for personal use only) version is available at archive.org
Macrium Reflect has a clear and simple interface. If you are not familiar with disk imaging, you can find many videos about it at YouTube. It is really easy.
By the way, don’t forget to create a rescue boot USB from Macrium reflect. You will use this rescue USB after SSD upgrade, to restore old data and operating system.
What You Need for HP 250 G3 SSD Upgrade?
You need only two things: a star screwdriver and an SSD disk drive.
- Screwdriver – You will need a thin Philips screwdriver. If you are dealing with these kinds of repair jobs, probably you already have plenty of these screwdrivers 🙂 If not, that cheap 24Pcs Small Precision Screwdriver Set is enough for this replace.
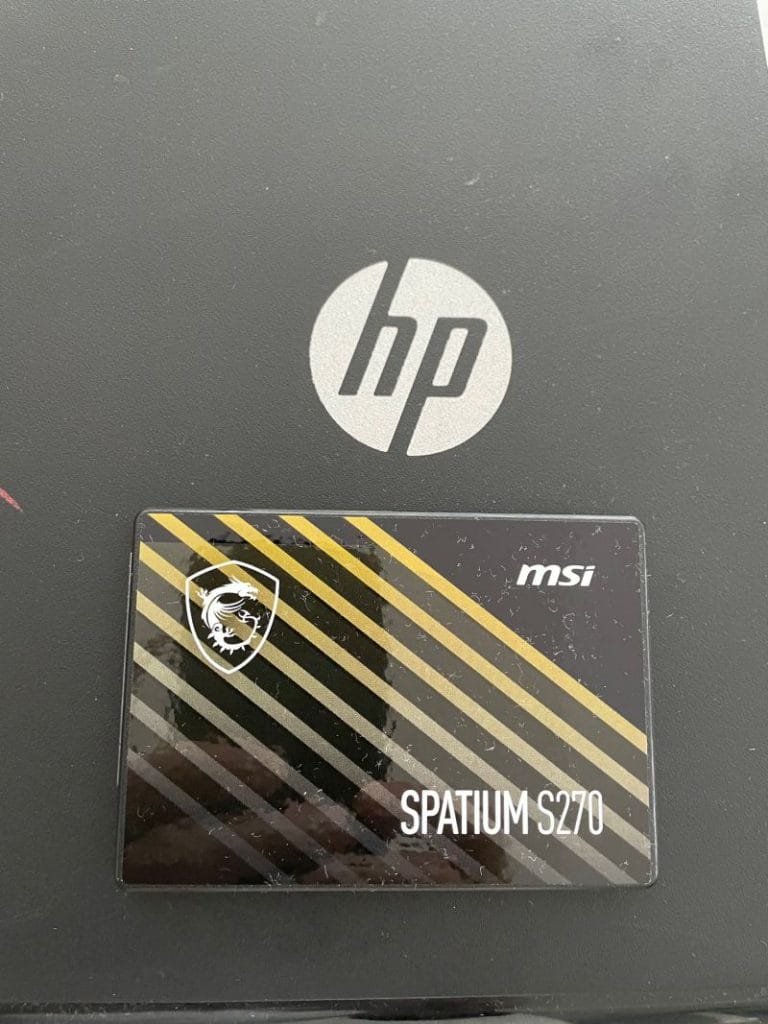
- SATA SSD Disk – HP 250 G3 notebook is fairly old and has no NVMe slot. For this reason, existing mechanical HDD will be removed, and new SATA SSD must be installed. I used MSI Spatium s270 240GB SATA SSD but, other branded SSDs are fine. I’ll list some of them below. I preferred 240GB, because I’ll use it just for daily jobs and 240GB is fairly enough for this purpose. If you are planning to use your notebook for storage purposes, you can buy 480/960 GB versions also.
HP 250 G3 Compatible SATA SSDs
- Kingston 240GB A400 SATA 3: https://amzn.to/3LeJH2B
- SAMSUNG 870 EVO SATA SSD 500GB: https://amzn.to/3JgQZ5z
- Western Digital 1TB WD Blue SA510 SATA: https://amzn.to/4oFnfyc
HP 250 G3 Notebook Disassembly
10-15 years ago, disassembling notebooks was much simpler, and replacing the HDD and RAM was incredibly easy. Unfortunately, most notebook producers integrated disks and memories into more compact parts of the notebook. For this reason, notebook disassembly became harder. HP 250 G3 is not an exemption.
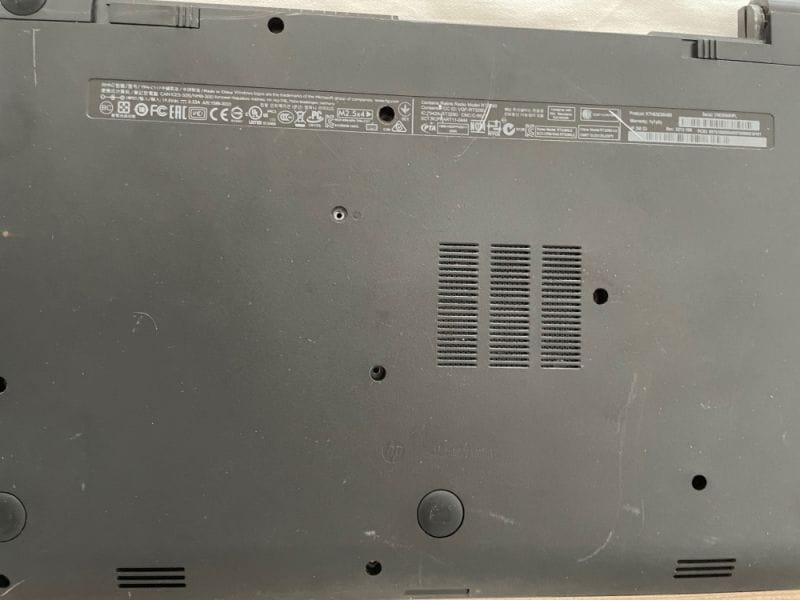
First of all, remove AC adaptor and de-attach battery. After that you need to remove all screws at the back of the notebook. This part is fairly simple. Only thing you must consider is that; there is two small screws under DVD Writer, which is seen after you remove DVD writer. If you don’t remove them, you cannot unplug upper cover
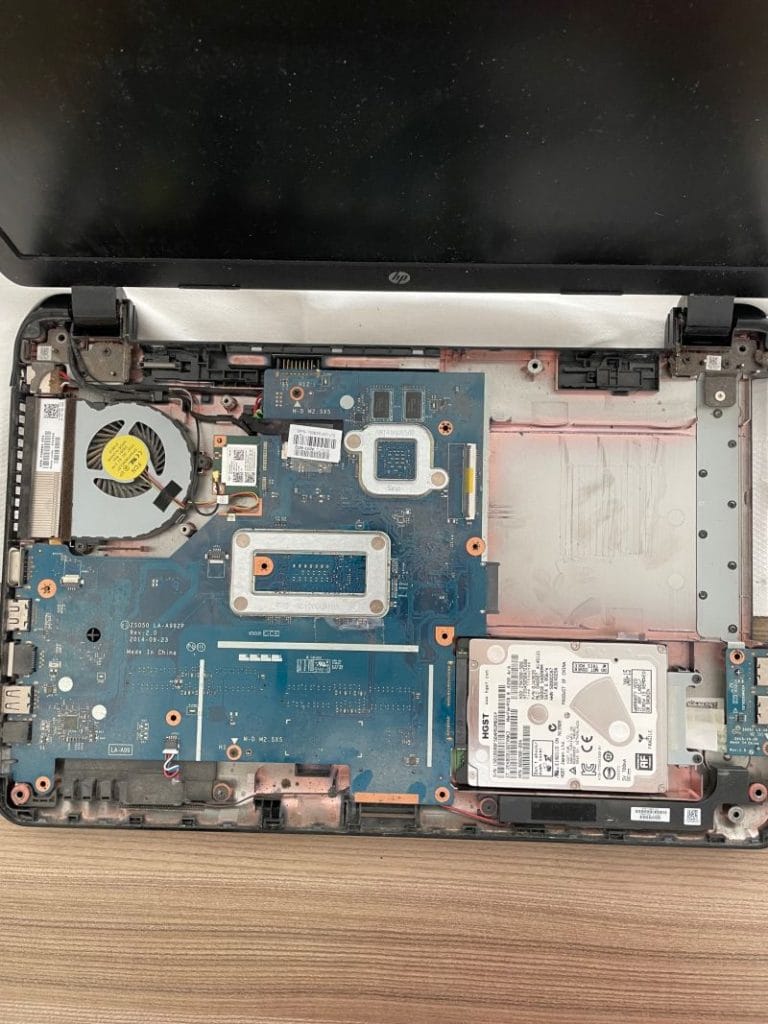
Unfortunately, rest of the disassembly a bit tricky. But, thanks to How-FixIT user at YouTube. He prepared a perfect video for complete disassembly of HP 250 G3. Notice that, if you just want to change HDD with SSD, you don’t need to disassemble all parts. It is only necessary for RAM upgrade. You may skip rest of the video, after SSD part. (Actually, you should! 🙂 Because rest is absolutely unnecessary for SSD upgrade and complicated)
HP 250 G3 Cleaning
After you remove upper cover, you might see a dusty and dirty notebook 🙂 This is absolutely normal for a 10-year-old notebook. If you have an air blower, clean the inside of the notebook. This may increase the performance and life of your notebook due to clean notebook air fan.
After HP 250 G3 SSD Disk Change
If everything went perfect, you have changed your old HDD and now you have an unbootable empty SSD, at inside of HP G3 notebook. It is time to restore old operating system and data OR install a fresh OS (Windows, Linux etc).
For a long time, probably, you used Microsoft Windows derivatives. They are usually good OS. But there are better alternatives, like Linux. Especially for such an old notebook. If you are going to use HP 250 G3 for standart jobs, Linux might be a good choice. I use Linux Mint as dual-boot and advise you to give a chance.
Anyway, back to windows restore 🙂 If you had used Macrium Reflect (or other imaging tool) to backup old data, now insert USB rescue disk to HP notebook and restore your old HDD disk image to new SSD.
If everything is OK, windows boots and you get a very fast (compared to old one) notebook.
If it is not booting, there might be a few reasons. One of them is UEFI/Legacy problem.
HP 250 G3 SSD Disk Upgrade – UEFI/Legacy Problem
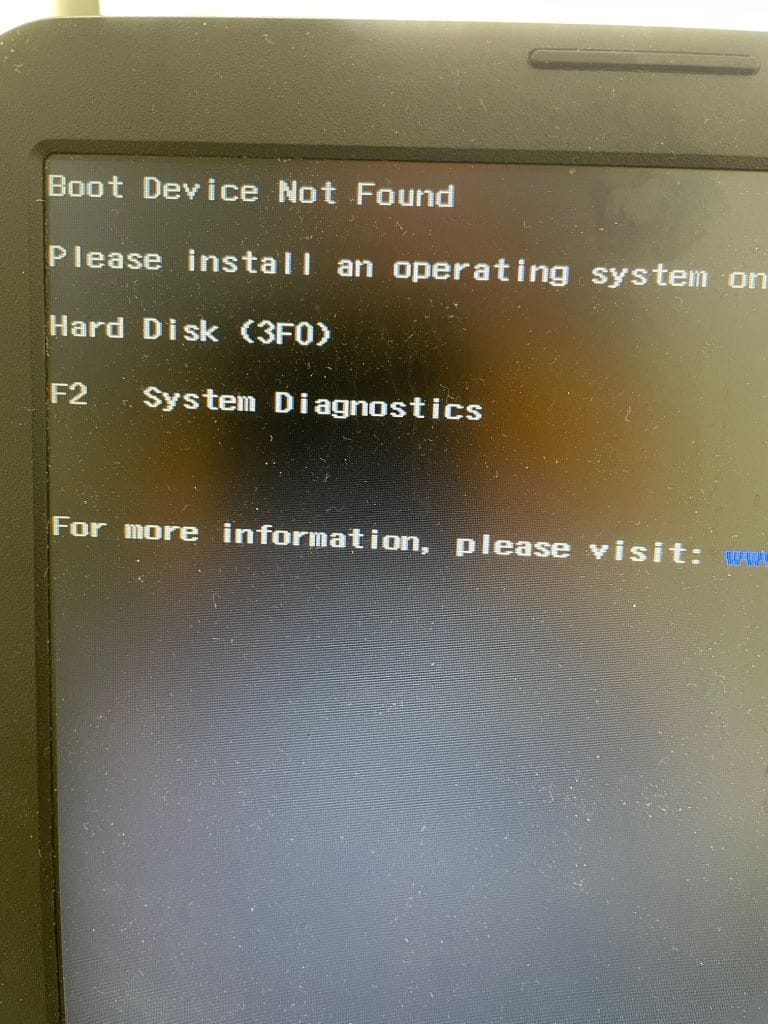
If you get the following “Boot Device Not Found — Please install an operating system…” error, after disk image restore, reason of this error is probably Legacy/UEFI problem.
UEFI is a more recent boot mode. It has better features, but Legacy is not bad. It works more versatile and compatible, especially for older devices. Easiest way is to switch from UEFI to Legacy, at BIOS. (When windows loaded, there are ways to convert Legacy to UEFI, if you prefer)
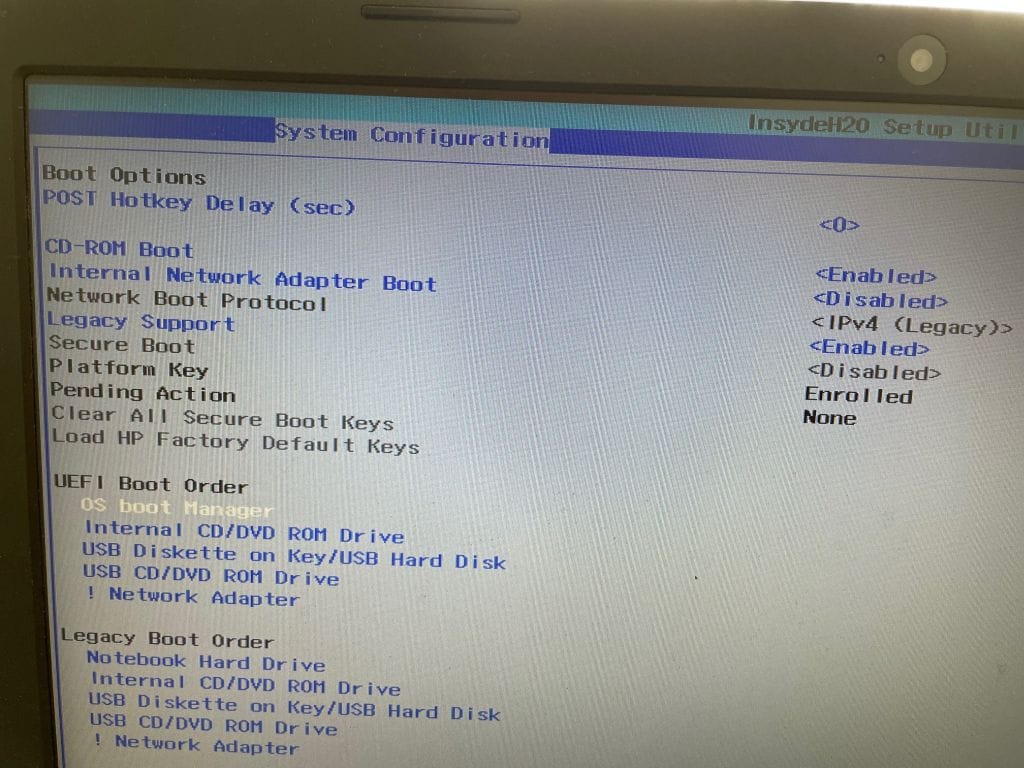
Now, pres F10 and enter BIOS. Go to “System Configuration” and then “Boot Options“. At this menu enable “Legacy Support” and save configuration.
HP 250 G3 SSD Upgrade Performance Test
As expected, upgrading HP 250 G3 notebook with an SSD disk, improved overall system performance very clearly. Boot time down to 20-25 seconds. Best thing was improved system response. Now, I can run all standart Windows applications without problem, even basic games! This was exactly what I was expecting from an SSD upgrade.
Additional RAM upgrade absolutely would be better but 4GB is fine for daily jobs and enough for now.
This is the CrystalDiskMark test after SSD (MSI Spatium s270) upgrade at HP 250 G3 Notebook. This is amazing 🙂

I hope you did all this HP 250 G3 SSD upgrade and working with your new and fast SSD disk 🙂
If it is so, write a comment below. If you had any problem and can’t solve, please leave a message below, I’ll try to help you.
Written by Metin Karal
Metin Karal is a Computer Engineer with over 25 years of experience working with internet technologies, trends, and digital tools since 1995. He brings this deep background into his product reviews, combining technical expertise with careful research to deliver honest, practical insights for readers. Passionate about technology, Metin also enjoys programming in C# and is currently developing PairMem, a challenging memory game available for free on the official Microsoft Store.
Disclosure: This article may contain affiliate links. As an Amazon Associate, we earn from qualifying purchases at no additional cost to you. For more details, please see our [Privacy Policy]
- 5 Best Wireless Earbuds Under $30 (2026) – Affordable Picks Reviewed

- 5 Best Left Handed Ergonomic Mouse 2026 (Review & Buying Guide)
- 5 Best USB Flash Drives 2026 – Speed, Durability & Value Compared
- Shark Stain Striker Review – Pros, Cons & Buyer’s Guide
- Lepro Solar Lights for Outside Review


